
Sound Pressure Level Meter
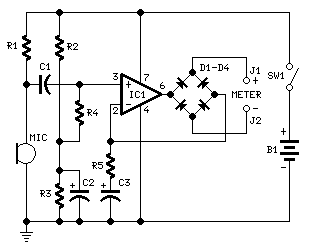
This project involves the construction of a home cinema calibration tool designed to ensure that all loudspeakers deliver sound at an equal level when experienced from the designated listening position. The core of the project is an AC millivoltmeter, which can be achieved using a standard multimeter configured for low current measurement, specifically at 50 or 100 µA full-scale deflection. The probes of the multimeter are connected to designated points, J1 and J2, for accurate readings of the audio signals.
The precision of the measurements conducted by this device is influenced by the frequency response of the microphone employed. In this scenario, the use of a miniature electret microphone is recommended due to its affordability and sufficient performance for the intended application, where absolute flatness in frequency response is not critical.
To carry out the calibration, the amplifiers powering the loudspeakers are activated sequentially, each receiving a sine wave signal within the frequency range of 400 Hz to 1 kHz. This frequency range is chosen to effectively assess the loudspeaker outputs. A signal generator, such as a 1 kHz Sine Wave Generator or a Spot-Frequency Sine Wave Generator, can be utilized to produce the required sine wave signals. It is imperative to adjust the volume control of the amplifiers to a low setting initially to mitigate the risk of damaging the loudspeakers during the calibration process.
Once the Sound Pressure Level Meter is powered on, the amplifier volume should be gradually increased until a reading close to the center scale is achieved. This process should be repeated for each loudspeaker channel to ensure uniform output levels across the entire home cinema system. By following these steps, users can successfully calibrate their home cinema setup, enhancing the overall audio experience.This project was requested by some correspondents wishing to setup their home-cinema set adjusting all the loudspeaker outputs to the same level when heard from the listening position. In practice this device is a simple (though linear and precise) ac millivoltmeter, using an existing multimeter set to 50 or 100 µA fsd with the probes connected to
J1 and J2 to read the results. The precision of the measure is entirely depending on the frequency response of the microphone used but, fortunately, for the main purpose of this circuit an absolutely flat response is not required. Therefore, a cheap miniature electret microphone can be used. The amplifiers driving the loudspeakers must be fed, one at a time, with a sine wave in the 400Hz - 1KHz range, but different values can also be chosen.
For this purpose you can use a simple signal generator circuit like one of those available on this site, namely: 1KHz Sine wave Generator or, better still, Spot-frequency Sine wave Generator. Please be careful and set the volume control very low, to avoid loudspeakers` damage. Switch-on the Sound Pressure Level Meter and increase the volume of the amplifier in order to obtain an approximate center-scale reading.
Repeat the same steps with all channels. Be the first of your friends to get free diy electronics projects, circuits diagrams, hacks, mods, gadgets & gizmo automatically each time we publish. Your email address & privacy are safe with us ! 🔗 External reference
Related Circuits

Creating a variable space in a small room can be enjoyable; however, designing an actuator to move a wall or room partition poses challenges. This can be achieved using an analog audio line delay. To implement a system that allows...
A sound-detecting alarm system can be constructed using a microphone, a high-gain amplifier, and a detector-relay driver. For a latching setup, connect the dotted lines to the relay as indicated in the schematic. The sound-detecting alarm system utilizes a microphone...
The circuit presented is a highly useful and accurate digital voltmeter featuring an LED display, utilizing the ICL7107 integrated circuit from Intersil. The ICL7107 is a high-performance, low-power, 3.5-digit analog-to-digital converter (ADC). This IC incorporates internal circuitry for seven-segment...
The receiver is an audio amplifier connected to SPKR1, a piezo speaker utilized as a microphone. An oscilloscope or headphones can serve as a detector. The oscilloscope can be triggered horizontally by the transmitted acoustic pulse, while the vertical...
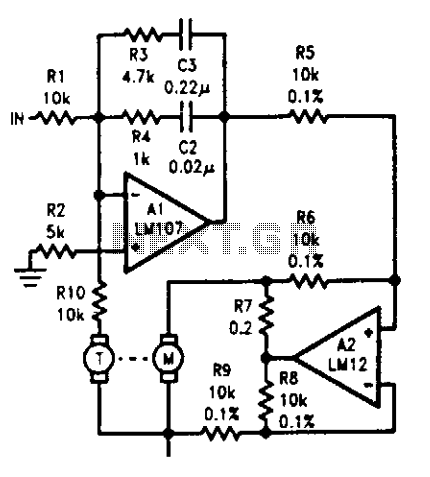
The tachometer, mounted on the same shaft as the DC motor, functions as a generator, producing a DC output voltage that is proportional to the motor's speed. A summing amplifier, labeled as Al, manages its output to ensure that...
This application note details the operation and features of the FAN7601, a BCDMOS programmable frequency current mode PWM controller designed for offline adapter applications and auxiliary power supplies. To minimize power loss during light and no-load conditions, the FAN7601...
Warning: include(partials/cookie-banner.php): Failed to open stream: Permission denied in /var/www/html/nextgr/view-circuit.php on line 713
Warning: include(): Failed opening 'partials/cookie-banner.php' for inclusion (include_path='.:/usr/share/php') in /var/www/html/nextgr/view-circuit.php on line 713