
The Ultimate Mod An Electronic Cruise Control For Your FI Vulcan

The installation of the Audiovox CCS-100 Cruise Control Kit requires careful planning and execution to ensure safety and functionality. The project necessitates the removal of the gas tank, which is a critical step for accessing the wiring and installation areas. The left side cover box will undergo modifications, including drilling and slotting, to accommodate the cruise control components. Proper tools, such as a Dremel tool for cutting and shaping, are essential for achieving precise modifications without damaging the surrounding components.
Before commencing the installation, it is advisable to gather all necessary parts, including a 2" PVC slip-on coupling and plugs, as well as spacers to maintain proper clearance for the side cover inner liner. These components can typically be sourced from plumbing supply stores or larger hardware retailers. The installation instructions will be structured in a logical sequence, allowing for a step-by-step approach that minimizes confusion and enhances the likelihood of success.
The initial phase of the installation involves configuring the DIP switches on the servo assembly. This programming step is crucial for ensuring that the cruise control system responds appropriately to the motorcycle's dynamics. The sensitivity settings can be adjusted based on personal riding preferences, making it important to familiarize oneself with these options before finalizing the installation.
Throughout the process, it is recommended to refer to the detailed illustrations and photographs provided in the manual. These visual aids will assist in clarifying the installation steps and ensuring that modifications are performed correctly. Maintaining an organized workspace and keeping track of all components will contribute to a smoother installation experience.
In summary, while the installation of the Audiovox CCS-100 Cruise Control Kit may present challenges, careful adherence to the instructions and preparation can lead to a successful outcome. The project is designed to empower motorcycle owners to enhance their riding experience with added convenience and control.This is not an attempt to scare anyone off the project but it is NOT a task for the timid. You will be involved with a considerable amount of electrical wiring, you will be slightly modifying the inner liner of your left side cover box ( just drilling some holes and making one slot), you will be cutting a vacuum hose (just a tiny one), you will be removing the gas tank (no getting around it this time) and you will have to READ THE INSTRUCTIONS very carefully. Click Here to see the AudioVox instruction manual in. PDF format. Not gone yet Great! I wasn`t kidding about reading the instructions. This page will go into tremendous (sometimes over the top) detail and there will be many pictures and drawings to help.
After reading everything on the page I would strongly suggest printing it all, even the full size pictures (get them by clicking on thumbnails) and put it all in a binder of some sort so you don`t end up with paperwork scattered all over the garage. You may also want to check things off as you go or (shades of college) write in the margins so a pen clipped or tied to the binder wouldn`t be a bad idea.
You can install the Audiovox kit using only the parts that come in the box. Bob Sanders has done this (as have hundreds of other owners). His parts list (all items in the kit) and how he used each of them is listed separately near the bottom of this page here. You`ll also find alternate ways to the same end provided by Max French here. Notice the photos on this page show a modification made to the left side cover inner liner on a 1500 Vulcan.
If you have a 1600 take a look at this page that shows how you need to modify your liner. Don`t panic, it`s only plastic. Nomad and Classic owners who have followed the instructions posted here (along with those that came with the Audiovox unit) report it is a reasonably easy job when broken down into individual components. Ok, lets do this. The following instructions are in sections. We start with "what you need" and work our way through tools, electrical and vacuum (and occasionally back again).
Take it section by section and you`ll discover it really isn`t that hard a job. Challenging Yes. Hard No. 1- Audiovox CCS-100 Cruise Control Kit This is available (at this writing) through J. C. Whitney on this page. I suggest you shop around on the Internet for best pricing. 1- 2" PVC slip-on coupling, (not a repair coupling, which are shorter in length) the length should be almost 3" long. You `might` be able to find this part at a large hardware store like Lowes or Home Depot but more likely a plumbing supply business that deals with PVC pipe (sprinkler systems) on a regular basis.
See Picture #14 2- 2" PVC slip-on plugs (not caps) close to 1 7/16" in length. As above if you can`t find these parts at a hardware store check a plumbing supply. See Picture #14 4- 3/16" thick spacers (to hold the side cover inner liner slightly away from the bike. A couple of thick washers will do or find some plastic spacers as shown in Picture #11 If you`ll be making your own brackets a full machine shop would be nice but you can probably get away with a Dremel tool.
A Dremel tool is also handy for modifying the inner liner of the side cover. This has already been said but let me say it again. Please read these instructions and those that come with the Audiovox unit completely through before beginning. It is extremely important you be familiar with all procedures before digging in. The Installation begins with the set-up of the DIPSWITCHES or what Audiovox calls, "PROGRAMMING THE SERVO ASSEMBLY".
Remove the cover on the back of the servo unit and set the switches to the following positions SW # 5= OFF (These settings are for "Medium Sensitivity" You may decide later to change settings for "Low Sensitivity" if the bike seems jerky or is too reactive for your particular riding environment or to "high" sensitivity if you live in an area with very hi 🔗 External reference
Related Circuits
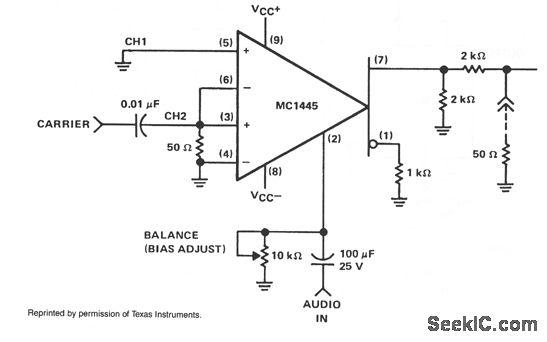
When the carrier level is sufficient to activate the cross-coupled pair of differential amplifiers, the modulation signal applied to the gate will switch at the carrier frequency between the collector loads. This switching process results in the modulation being...
This project utilizes integrated circuits from Holtek Semiconductor, specifically the HT6221 and HT6222. Similar components were previously manufactured by NEC Semiconductor, including the uPD6121 and uPD6122. These integrated circuits are widely employed in infrared remote controls for televisions and...
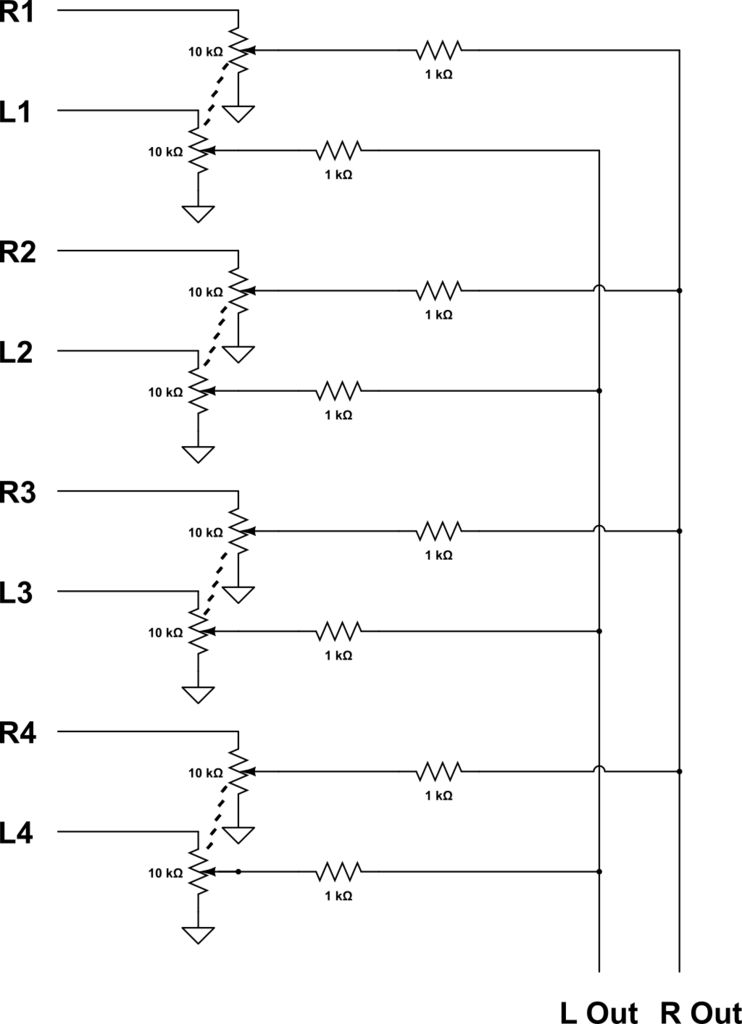
This audio mixer combines multiple audio inputs into a single audio output, equipped with knobs to adjust the volume for each channel. The specific build includes... The audio mixer is designed to facilitate the blending of various audio signals, allowing...
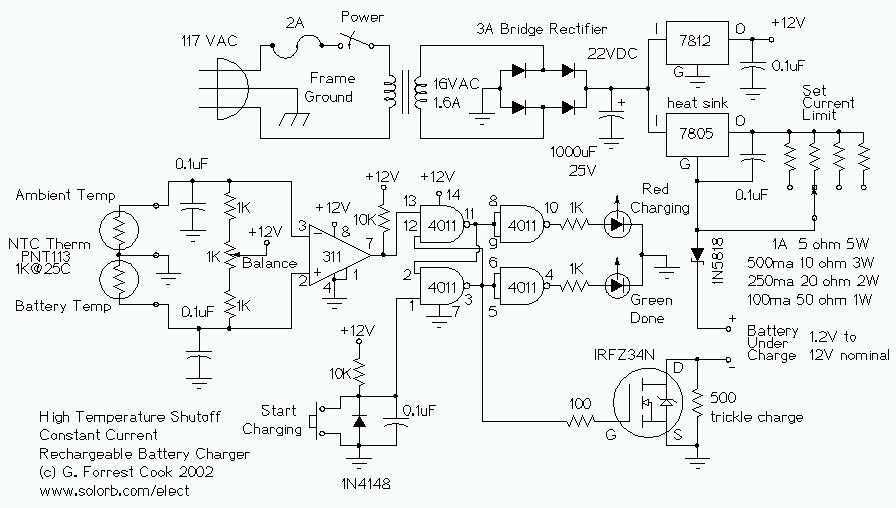
This circuit is for a temperature controlled constant current battery charger. It works with NICD, NIMH, and other rechargeable cells. The circuit works on the principle that most rechargeable batteries show an increase in temperature when the cells become...
The PWM pulse width modulation controller board enables 9S12/HCS12 microcontrollers or PIC microcontrollers to output 8 channels, each capable of delivering 5 DC amps, while incorporating current sensing for the PWM waveform. This PWM driver circuit is suitable for...

A radio remote control system utilizing DTMF (Dual-Tone Multi-Frequency) technology is presented. This circuit allows for the control of various electrical appliances through radio frequency signals. The described radio remote control system employs DTMF tones, which are generated by a...