
Transistor Clock

The transistor clock kit is an engaging project for hobbyists and electronics enthusiasts. It comprises 194 discrete transistors, along with a variety of other components, including resistors, capacitors, and diodes, all laid out on a printed circuit board (PCB). The design of the PCB is intentional, allowing for easy access to each component, which enhances the educational experience by enabling users to probe and analyze each signal path.
The clock operates based on a classic transistor-based timing circuit, utilizing the properties of transistors to create oscillations that drive the timekeeping mechanism. The assembly process begins with the careful placement of each component according to the provided schematic, which is designed to minimize errors and facilitate understanding of the circuit's functionality.
The kit also includes a detailed assembly manual that outlines each step of the process, from soldering techniques to debugging common issues that may arise during assembly. This resource is invaluable for individuals who may not have prior experience with soldering or circuit assembly.
In addition to the standard version, the kit offers variations, such as the nixie tube model, which incorporates vintage display technology, appealing to those interested in retro aesthetics. Each version maintains the core principles of analog clock design while providing an opportunity to explore different display methods.
Overall, the transistor clock kit serves as an excellent introduction to analog electronics, allowing users to engage with fundamental concepts in a hands-on manner. The project not only reinforces theoretical knowledge but also enhances practical skills in circuit assembly and troubleshooting, making it a worthwhile endeavor for both novice and seasoned hobbyists.So, if you have been following me on twitter, you might have noticed this tweet where I raved about a "Transistor Clock" kit that lets you build a wall clock using 194 discrete transistors and hundreds of other components. I`ve since purchased the kit and decided to blog my assembly of it. As electronics kits like Arduino become more and more popu lar, the relevance of old-fashioned analog electronics is waning. There are still a lot of common problems that can be solved simply with a few capacitors, resistors, and transistors, but many people opt to use more complex (and expensive) digital systems instead. I too have fallen victim to this trend and I feel like my analog prowess is not what it could be. I`ve had a lot of difficulty over the years understanding complex analog systems and even more difficulty trying to design them.
That`s why I was excited when I saw this ad in the back of Nuts and Volts magazine: As an engineer, I have sort of a thing for clocks. See, a clock is one of the few engineering problems that has been COMPLETELY SOLVED. Seriously. You can go to Wal-mart and buy a digital wristwatch that will last for years off its internal battery, travel 100 meters underwater, keep time to the millisecond, and cost less than a night at the movies.
Clocks are done. Because of this, any newly designed clock is going to be more of an artistic expression or a self-imposed engineering challenge (can we make a clock that runs off of a potato! ). The transistor clock is both. This clock is presents a statement that in the era of integrated circuits, it`s still possible to make a clock using parts from the 1950s.
Every digital circuit you build with today is abstracted out of analog components, so there is a lot to learn from working with these components directly. Perhaps the fortune cookie from my lunch could summarize: This analog/discrete-only limitation makes it hard though.
One of the major gains that the integrated circuit offers humanity is the ability to pack multiple transistors, resistors, capacitors, and diodes on the same tiny piece of silicon. When you separate them, they take up a lot more space. Look at the circuit board for this monster: It`s exciting though to have all of the components out in the open like that.
There will be no "black boxes". Every single signal path can be probed and completely understood. Cool! What an excellent learning opportunity! So this guy sells these clocks as kits through his website that you can assemble yourself. He sells a bunch of different versions including a nixie tube version which is extra retro. I thought these kits were really cool, and I really wanted to incorporate one into my blog somehow, but unfortunately they`ve already been designed! I usually make a point of making things that are challenging and have never been done before, but this clock is neither (especially when you consider that it`s a kitwith everything you need in the box).
I decided to purchase a kit anyway and give it the "ch00ftech treatment". The kit comes with an assembly manual which does a pretty good job of explaining how it works, but I decided it would be fun to take it all a step further and to create a few of my amazingly long writeups that you all have come to love. I really wanted to flesh out every detail. This transistor clock is an excellent project for hobbyists. The kit is beautifully laid out and it comes with everything you will need (including solder!) to assemble it (bring your own soldering iron though).
Given how well organized it is, you don`t really even need any background in EE to assemble it. The assembly manual even has instructions on how to solder if you aren`t comfortable with soldering yet and tips for debugging issues. If you simply follow the instructions and place the components in the right holes, you`ll end up with an awesome transistor clock of your own!
🔗 External reference
Related Circuits
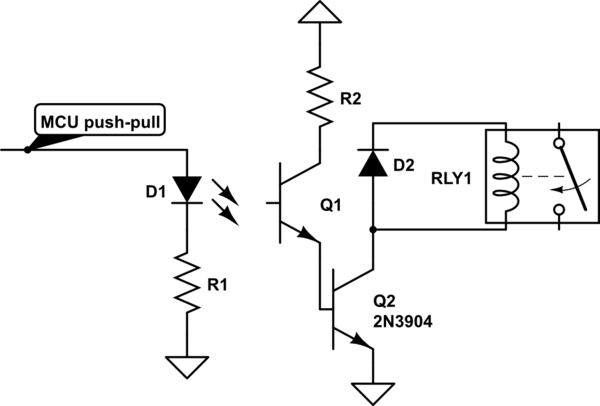
Controlling a relay with an STM32 microcontroller involves using a 4N33 opto-isolator for electrical isolation. The relay coil requires approximately 250 mA, necessitating the use of an MPS222 transistor for switching. The GPIO configuration inverts the logic when used...
The following circuit illustrates a UHF Indicator Wavemeter Circuit Diagram. This circuit utilizes dual BF494 transistors. Features: the oscillator is... The UHF Indicator Wavemeter Circuit is designed to measure and indicate the frequency of ultra-high frequency (UHF) signals. The circuit...
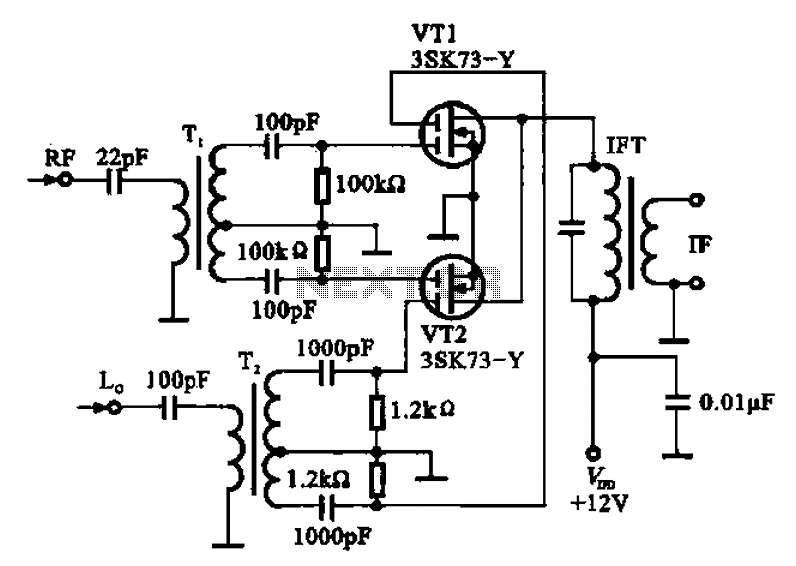
A balanced mixer circuit is illustrated using two dual-gate field effect transistors (FETs). The RF signal is coupled to the gates of these transistors through an input signal transformer (T1). Additionally, a local oscillation signal is introduced to the...
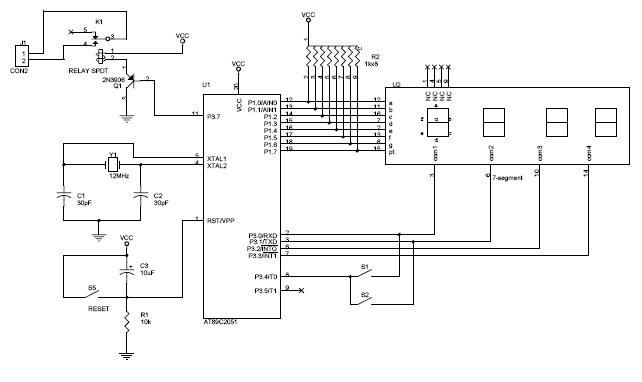
The circuit diagram above illustrates the Clock Controller V1.1. Pins P3.0 to P3.3 are connected to the base of a 4-PNP transistor, specifically the 2N2907, which is used to sink current. The Clock Controller V1.1 circuit is designed to manage...
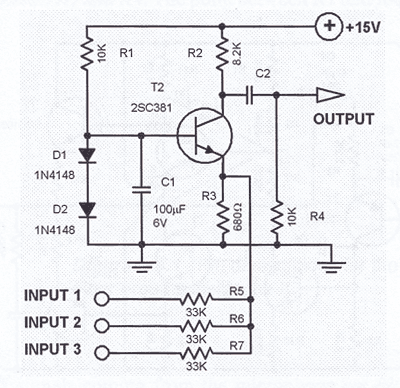
The simplest one-transistor audio mixer circuit diagram available. It utilizes a single transistor and can accommodate multiple audio signals, limited only by the user's budget. BC10. The one-transistor audio mixer circuit is a fundamental design that demonstrates the principles of...
A simple and practical electronic bell circuit can be constructed using the provided schematic diagram. This circuit can function as a doorbell or an alarm system. It utilizes only a few transistors along with several common components. The circuit...