
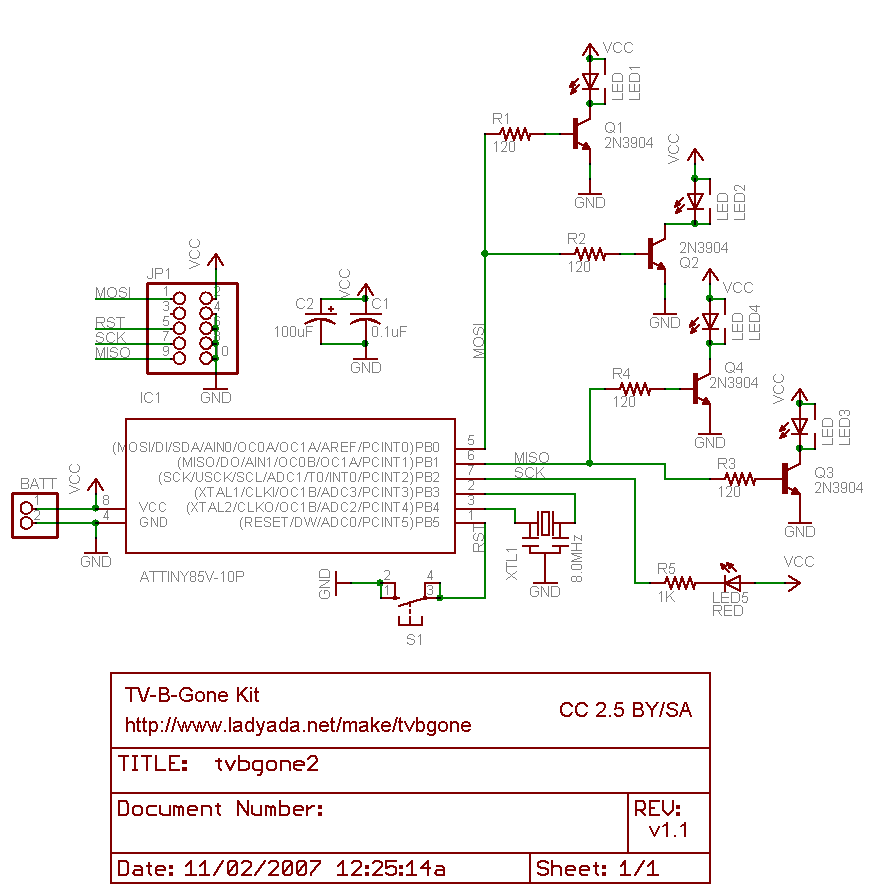
Why would an IR remote circuit use one resistor/transistor pair for each LED
Using a single transistor and resistor for each LED provides several advantages over a series configuration. First, individual control of each LED allows for greater flexibility in dimming and brightness adjustments. This is particularly beneficial in applications requiring varied lighting effects or patterns, as each LED can be independently modulated.
Moreover, connecting LEDs in series can lead to issues with current distribution. If one LED fails or has a different forward voltage drop than the others, it may affect the entire chain, resulting in uneven brightness or complete failure of the series string. By using separate transistors and resistors, each LED operates within its own circuit, ensuring consistent performance and reliability.
In terms of design, this approach simplifies troubleshooting. If an LED fails, the issue can be isolated to that specific LED and its associated components, rather than having to examine an entire series circuit. Additionally, this configuration allows for the use of different types of LEDs with varying voltage and current ratings, as each can be tailored to its respective specifications.
In summary, while chaining LEDs in series with a single transistor may seem like a simpler solution, the individual transistor-resistor pair for each LED offers enhanced control, reliability, and ease of maintenance, making it a preferred choice in many applications.Why have one resistor and transistor for each LED, instead of chaining the LEDs in series and controlling them with a single transistor which is controlled, in turn, by the arduino pin coming in through a single resistor I have no qualms about implementing the same way (frankly, I`m tempted to use about 32 LEDs, resistors, and transistors just for the hell of it, ) but I`d like to understand why it was done this way. 🔗 External reference
Related Circuits
The code implementation discussed in the previous post has been initiated. To improve organization, the code has been modularized into functions, simplifying the overall structure. It is available along with the other code. Challenges were encountered in calculating averages...

The three astable circuit is illustrated, demonstrating that each level of the transistor's base is connected by a capacitor between the two levels, ensuring tight coupling. Additionally, each base electrode is biased through a resistor (Rb) connected to the...
You have read about computerized rooms or seen home automation products advertised in electronics magazines. You have decided to try it yourself. However, it is important to note that this project is not inexpensive. A computer is required, which...
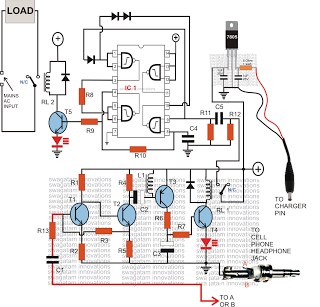
Control any electrical device from anywhere in the world using a cell phone, without incurring costs for individual commands. This system allows operation of various appliances, such as vehicles, doors, and air conditioners, with a simple button press on...
This is an enhanced infrared (IR) remote control extender circuit. It features high noise immunity, resistance to ambient and reflected light, and an extended range of approximately 7 meters from the remote control to the extender circuit. It is...
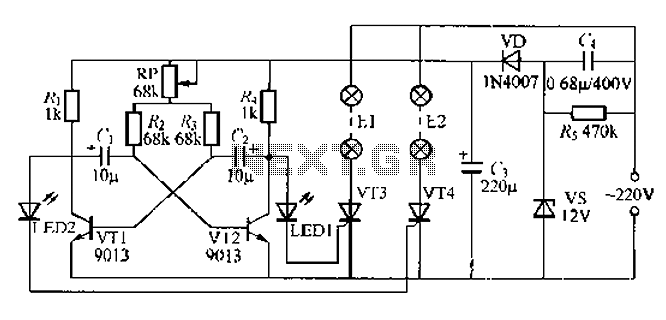
The circuit utilizes a thyristor-controlled unidirectional flashing light string controller. Diodes VT1 and VT2 are connected to a multi-oscillator. Upon powering the circuit, VT1 and VT2 alternately turn on and off. When VT1 is deactivated, VT2 is powered by...
Warning: include(partials/cookie-banner.php): Failed to open stream: Permission denied in /var/www/html/nextgr/view-circuit.php on line 713
Warning: include(): Failed opening 'partials/cookie-banner.php' for inclusion (include_path='.:/usr/share/php') in /var/www/html/nextgr/view-circuit.php on line 713