
Blinking LEDs with PIC microcontroller using C

The circuit for blinking an LED using a PIC microcontroller involves several key components and a straightforward configuration. The primary element is the PIC microcontroller, which serves as the central processing unit for the application. A commonly used model for such introductory projects is the PIC16F84 or similar, due to its simplicity and ease of use.
In this setup, the LED is connected to one of the GPIO (General Purpose Input/Output) pins of the PIC microcontroller, typically configured as an output. A current-limiting resistor is placed in series with the LED to prevent excessive current flow that could damage the LED. The value of the resistor is usually chosen based on the forward voltage and current specifications of the LED, commonly around 330 to 470 ohms for standard 5mm LEDs.
The C program written for this application will include the following key components:
1. **Initialization**: The program begins with the initialization of the microcontroller's settings, including the configuration of the GPIO pin connected to the LED as an output.
2. **Main Loop**: The core of the program consists of an infinite loop where the LED is toggled on and off. This is typically achieved using a delay function to create a visible blinking effect. The delay can be implemented using a simple loop or by utilizing a timer interrupt, depending on the complexity desired.
3. **Toggling the LED**: The program will set the output pin high to turn the LED on and then set it low to turn the LED off. The duration for which the LED remains on and off can be adjusted by modifying the delay period.
4. **Compilation and Uploading**: After writing the program, it must be compiled using an appropriate C compiler for PIC microcontrollers, such as MPLAB X IDE with XC8 compiler. The generated hex file is then uploaded to the microcontroller using a programmer, such as the PICkit or ICD.
This basic project serves as an essential starting point for understanding microcontroller programming and interfacing with external components. It lays the groundwork for more advanced projects involving additional peripherals and complex functionalities in the realm of embedded systems.Very first PIC program using C language. Explains how to blink a single LED using PIC microcontroller with C program. Start learning C programming for PIC here.. 🔗 External reference
Related Circuits

This design features a signal logic tester that utilizes a common cathode seven-segment display. The display indicates a logic level "1" (represented by an "H" on the display) or a logic level "0" (represented by an "L" on the...

The following schematic illustrates the design of a 4 Watt Amplifier Circuit Diagram intended for portable radio applications, utilizing the TDA1011 integrated circuit from Philips Semiconductor. The 4 Watt Amplifier Circuit is designed to provide audio amplification in portable radio...

External circuit converts bass beat of music into pulses. The motor is controlled by them. If there's bass beat recognized then the motor rotates one direction (in full stepping) for a predefined time then stops. If the second beat...

In August 2007, an individual with a passion for photography acquired a Panasonic FZ30 digital camera and joined a forum on dpreview dedicated to Panasonic products. A fellow forum member, who was a programmer and electronics enthusiast, created a...

One of the main considerations in phono preamplifier design is the choice between active (feedback) and passive equalization. An ideal feedforward preamplifier for a moving magnet cartridge would provide approximately 40 dB of gain before the equalizer (more for...
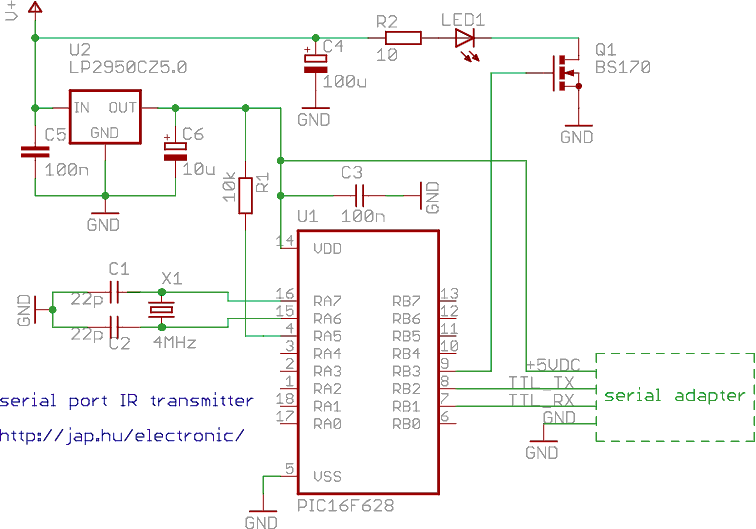
This is a programmable infrared (remote control) transmitter, which can be controlled from a PC serial port. It is capable of sending many remote control formats, including the Philips RC-5 standard. Exact formats with the timing parameter names are...