
Arduino Vocal Effects Box
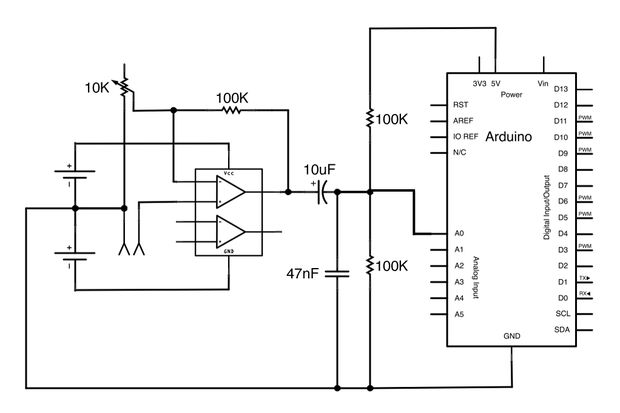
The project allows for subtle pitch shifting to achieve androgynous vocal sounds, inspired by artists such as Fever Ray. The system utilizes an audio potentiometer with a control switch, though alternatives may be necessary if specific components are unavailable. A 1M logarithmic potentiometer with a switch may be used, and consideration should be given to connecting external instruments like a drum machine or synthesizer to the input. The circuit includes a blocking capacitor that allows AC signals to pass while filtering out DC offsets, with the capacitor's size influencing the response time and cutoff frequency. Although the Arduino's processing power may limit simultaneous operations, the project could be expanded with higher processing power models or by integrating an external audio codec for improved fidelity.
The Arduino's capability to sample audio at a high rate is noteworthy, and while recording to an SD card is theoretically possible, it may encounter speed limitations due to the processing demands of audio input and output. The project can serve as a creative tool for exploring vocal effects and digital audio manipulation.
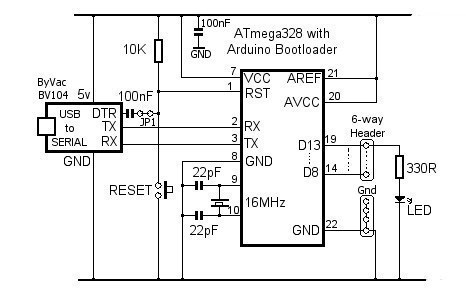
The circuit schematic for this vocal effects box primarily consists of the Arduino microcontroller, an audio input interface (microphone), an audio output interface (speaker or headphones), and a granular synthesis algorithm implemented in the Arduino's firmware. The audio input is processed through an analog-to-digital converter (ADC) to facilitate digital manipulation. The granular synthesis technique is achieved by segmenting the audio signal into grains, which are stored in memory for real-time processing.
The output stage includes a digital-to-analog converter (DAC) to convert the processed audio back into an analog signal for playback. The inclusion of a potentiometer allows for user control over parameters such as volume and pitch shifting, enhancing the interactive experience. The design should also incorporate appropriate filtering components to manage any unwanted noise and ensure clean audio output.
In terms of power supply, the circuit should be designed to accommodate the voltage and current requirements of the Arduino and associated components, ensuring stable operation during audio processing tasks. Additionally, the layout of the schematic should consider signal integrity, minimizing interference between audio signals and digital control lines. Proper grounding techniques and decoupling capacitors may be employed to enhance performance and reliability.
Overall, this Arduino-powered vocal effects box represents an innovative application of digital signal processing techniques, providing a platform for experimentation and creativity in audio manipulation.This Arduino-powered vocal effects box pitch shifts and distorts incoming audio signals to produce a wide variety of vocal effects. This project is my first experiment with real-time digital signal processing using Arduino. It samples an incoming microphone signal at a rate of about 40kHz, manipulates the audio digitally, and then outputs 8 bit a
udio at 40kHz. To minimize the amount of computation required by the Arduino, I used a technique called granular synthesis to manipulate the incoming audio signal. Essentially, as audio comes into the Arduino it gets cut up and stored as small (millisecond or microsecond sized) samples called "grains.
" These grains are then individually manipulated and played back; they may be lengthened or shortened, stretched or compressed, played back in reverse, copied several times, or mixed with other grains. You can hear a (somewhat creepy) audio sample from the effects box below: Granular synthesis creates a unique type of distortion caused by discontinuities between individual grains in the outgoing signal.
Sometimes this distortion creates an effect I can only describe as a "ripping" sound, other times it introduces new frequencies into the audio that were not present before. Here is an example by Aphex Twin, the granular synthesis is especially prominent in the bridge at around 3min in.
Another example of granular synthesis, this time applied to vocals for pitch shifting and textural effects, is from Paul Lansky. My favorite thing to do with this effects box is to use subtle pitch shifting to achieve an androgynous vocal sound, I got the idea for the project after listening to copious amounts of Fever Ray this past winter, you can hear how she pitch shifts her voice to sound somewhat masculine at times.
Hi Amanda, the audio potentiometer with control switch isn`t available in radioshack and I can`t find anywhere to buy it. May I know the replacement for it, or can I use regular potentiometer as the replacement thanks for the reply.
right now, I have 1M logarithmic potentiometer with switch. will this potentiometer works with this project since the one you used is the regular without switch do you know would it be ok to plug an external instrument ie. a drum machine or synthesizer into the input of the box or would that cause some issues with power The capacitor isn`t really a DC offset - it`s a blocking cap which allows AC to pass and there is a major difference.
DC offset is constant while blocking caps must take charge and discharge times into account, and also act as a high pass filter by default. The larger the cap the slower the response of blocking DC will be, while the lower the value the higher the cutoff or corner frequency of the Filter.
Trade-offs. This is an interesting project. Would love to try it out as a toy for my niece! Do you have any idea is there another model of arduino`s with higher processing power and with the similar schematic right now it just get`s stored in the arduino`s memory, you can theoretically record to an SD card, but I have a feeling you will run into speed problems. The audio in/out is hogging most of the arduino`s processing power, so it`s difficult to do too many more things in parallel.
I see. Yeah I was actually quite surprised at the relatively high samplerate you managed to achieve! I though the atmega328 was way to slow/simple to handle that. Have you considered using a audio codec (external ADC and DAC) ( for both input and output I don`t think there is very much point in increasing the fidelity after the processing when the audio is compressed to 8-bit fidelity when `entering` the Arduino. This could also be something to look into: (the schematic, first image below the youtube video) Hi Amandaghassaei!
First of; Great project! Im gonna have to build one this summer :) Something came to mind though. I saw you mentioned you were looking to increase the fidelity by adding a DAC chip. 🔗 External reference
Related Circuits
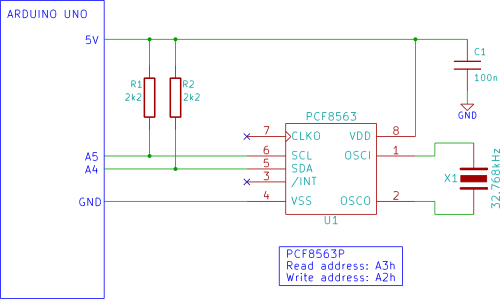
The Arduino displays the time and date on an optional LCD and in the Arduino IDE serial monitor window. A PCF8563 real-time clock (RTC) integrated circuit (IC) is utilized to generate the time and date. The time and date...
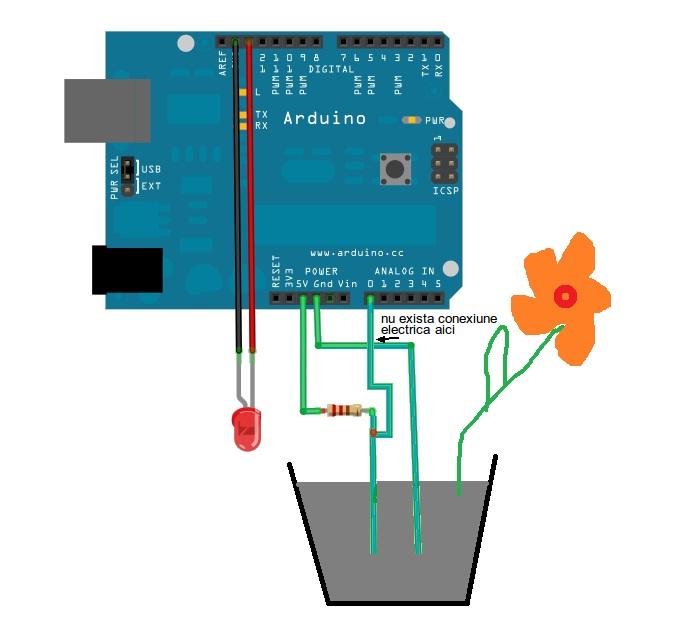
This is a simple Arduino project for a soil moisture sensor that will light up an LED at a certain moisture level. It uses the Arduino Duemilanove microcontroller. This project employs a soil moisture sensor to monitor the moisture content...
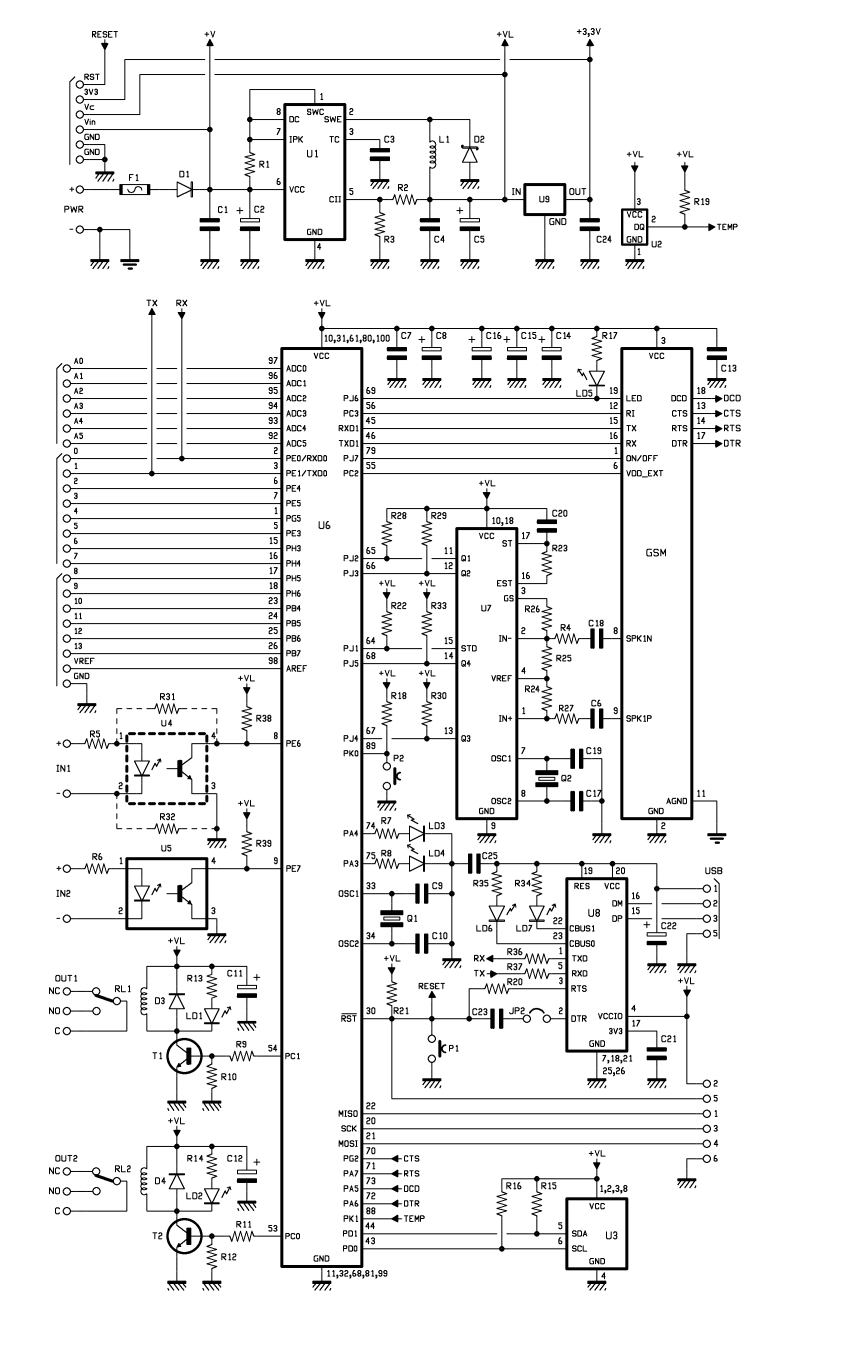
Utilizing the ATmega 2560, which serves as the core of the Arduino platform, a universal remote control with GSM capabilities has been developed. This device allows for the control of 2 inputs and 2 outputs, DTMF key functionality, gate...
A video switcher can be controlled using the computer's parallel port. However, as fewer PCs are equipped with parallel ports, and laptops do not typically have them, the need to control the switcher through a USB port has become...
Utilizing a digital infrared (IR) receiver module and a digital IR transmitter module, each connected to separate Arduino Uno boards, the objective is to transmit data, such as "1234", to the receiver and display this data on an LCD....
This wireless transmitter and receiver pair operates at 315 MHz. They can easily fit into a breadboard and work well with microcontrollers to create a simple wireless data link. As these are only transmitters, they will only facilitate one-way...
Warning: include(partials/cookie-banner.php): Failed to open stream: Permission denied in /var/www/html/nextgr/view-circuit.php on line 713
Warning: include(): Failed opening 'partials/cookie-banner.php' for inclusion (include_path='.:/usr/share/php') in /var/www/html/nextgr/view-circuit.php on line 713