
Coolingmist Installation
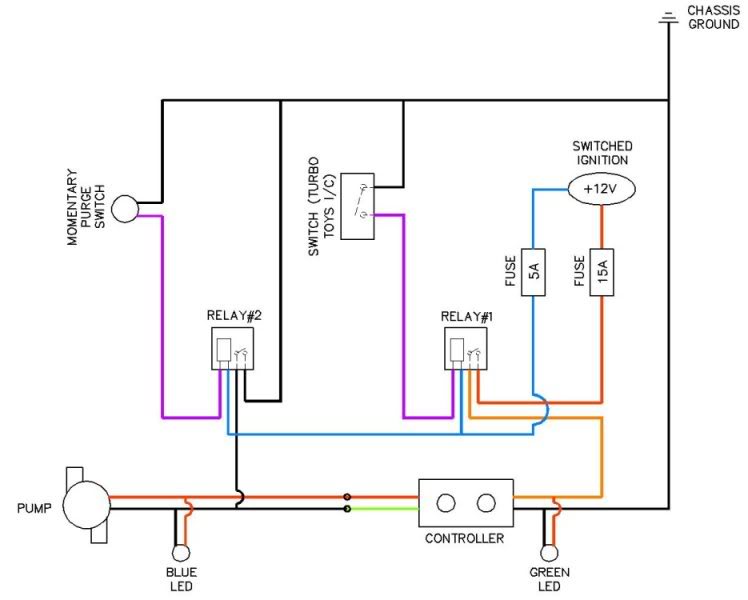
The Coolingmist Stage 3 HOM Trunkmount kit is designed for optimal performance in a methanol injection system. The installation process emphasizes the importance of a clean and efficient routing of hoses and wiring. The use of relays is crucial in managing the electrical components of the system. Relay #1, responsible for arming the system, ensures that the Varicool controller receives power only when the modified I/C sprayer switch is activated. This switch modification is a significant aspect of the installation, allowing for user-friendly operation with a push-on/push-off functionality.
Relay #2 serves a vital role by grounding the pump, enabling it to operate independently of the controller when the momentary push-button is pressed. This configuration allows for immediate activation of the methanol injection, enhancing the system's responsiveness during high-performance scenarios.
The choice of hose length is critical for proper installation; the initial 15-foot sections were insufficient, necessitating the acquisition of a longer 25-foot hose. This ensures that the methanol is delivered effectively from the trunk to the engine bay without kinks or excessive bends, which could impede flow.
Mounting the tank securely is essential for stability and safety. The innovative use of existing mounting points and additional screws to secure the trim demonstrates a practical approach to overcoming installation challenges. The drain valve addition enhances maintenance efficiency, allowing for easy tank drainage without the need for disassembly.
The routing of the meth line alongside the brake and fuel lines not only maintains a clean aesthetic but also adheres to safety standards by minimizing the risk of interference with other critical vehicle systems. The modification of the JMB hard pipe to accommodate the injection nozzles is an example of the attention to detail required for effective performance.
Overall, the installation of the Coolingmist Stage 3 HOM Trunkmount kit involves a blend of electrical and mechanical modifications, ensuring a robust and efficient methanol injection system tailored for high-performance applications.Coolingmist Stage 3 HOM Trunkmount kit. I figure it`s about time to get this thing installed so I can enjoy HOM 24/7. My plan is to have one switch for arming the system, and a second push-button for the purge. However, since I have Stage 3 With Toys, I want to scrap the whole intercooler sprayer assembly (it will now be useless), and modify the I/C sprayer button on the toys bezel to function as the arming switch for the meth injection. Here is the schematic: - Relay #1 arms the whole system. It completes the positive circuit between the Varicool controller and a 12V power source. This relay is controlled by the I/C sprayer switch, which is modified to function as a "push-on /push-off" switch. - Relay #2 grounds the pump, and should cause it to turn on independent of the controller. It is controlled by the momentary push-button. This will only work when the system is armed. [Can someone verify this is correct ] I believe this will work, but any input or suggestions are appreciated.
I`ll continue this thread as the installation progresses to bring up any tips / issues. One thing I noticed is that the trunkmount kit was shipped with 2 - 15` sections of polyethylene hose. However, 15` is not enough length to reach from the trunk to the engine bay, especially if you tuck/snake the hose for a clean install.
I went to Home Depot and picked up a 25` section of 1/4" O. D. hose with the same specs as the original for less than $5. 25` is the perfect length to comfortably route the hose from the trunk to the charge pipe. Mounting the tank was a hassle; there isn`t really any good place to mount the brackets for the tie-downs (due to the large size of the spare tire well cover). So I came up with a different solution which I think looks pretty clean. I secured the tank using the 4 nuts that are cast into the side of the tank (originally meant for mounting the controller to the side of the tank).
The tank is bolted to the plastic trim at the rear of the trunk. I also added 2 screws to better secure the trim, so the clips don`t pull out. Removing the tank is as easy as pulling out the 2 screws at the top, and pulling out the tank and trim in one piece. I also modified the pump/tank assembly a little. I added a harness to make it easy to unplug the pump, and I also added a drain valve (just below the harness).
The valve is connected to a piece of hose which exits the trunk through the same hole as the meth supply hose, and drains under the rear of the car. This allows me to easily drain the tank without removing anything. Last pic shows how I routed my meth line under the car. There is actually 1 vacant spot in the clips which hold the brake lines and fuel line. You can see the meth hose (white) neatly tucked in alongside the brake/fuel lines: Here is the beautiful JMB hard pipe which I ordered with 2 extra bungs for the injection nozzles.
Unfortunately I had to cut off 3/4 of the bung to get the nozzles to sit flush with the inside wall of the pipe. The bungs were too tall, and with the wide spray pattern of the injectors, the water would hit the sides of the bung and drip down.
No matter; with a little hacking it all turned out well. Close-up of the controller. The push-button to the top-left of the controller is my purge button. Power to the injection system is controlled by the intercooler sprayer button in the turbo toys bezel. I ditched the intercooler sprayer, and the switch required some hacking to convert it to a push-on / push-off switch, but it all works well now.
Here are the three LEDs. The blue and red LEDs are the ones that originally 🔗 External reference
Related Circuits

Electrical lines that include lighting circuits originate from the main distribution panel of the installation. Each line consists of three conductors: phase, neutral, and ground. All three conductors extend to the terminal point of each luminaire, and if the...
Feed the cable through a hole in the chassis to the opposite side. There, between the fan and the rear panel, the IFD board can be installed upside down. Use a thin and flexible insulating material, such as PE...

Smoke and fire alarms are a crucial component of a home's safety plan, and careful attention must be paid to the proper installation and wiring of fire alarms. The following guidelines provide basic instructions for installing a fire alarm...
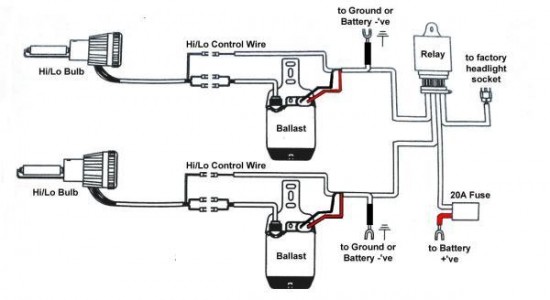
Before purchasing an HID kit, the first step is to determine the appropriate bulb size (e.g., H1, H3, H4, H7, H9, H10, H11, H13, 9004). To successfully integrate an HID (High-Intensity Discharge) lighting system into a vehicle, it is essential...
First and foremost, if one is not skilled with tools and electrical systems, it is advisable to hire a qualified electrician rather than attempting to undertake this task independently. The electrician should review this page for specific cautions and...
Warning: include(partials/cookie-banner.php): Failed to open stream: Permission denied in /var/www/html/nextgr/view-circuit.php on line 713
Warning: include(): Failed opening 'partials/cookie-banner.php' for inclusion (include_path='.:/usr/share/php') in /var/www/html/nextgr/view-circuit.php on line 713