
LED display unit
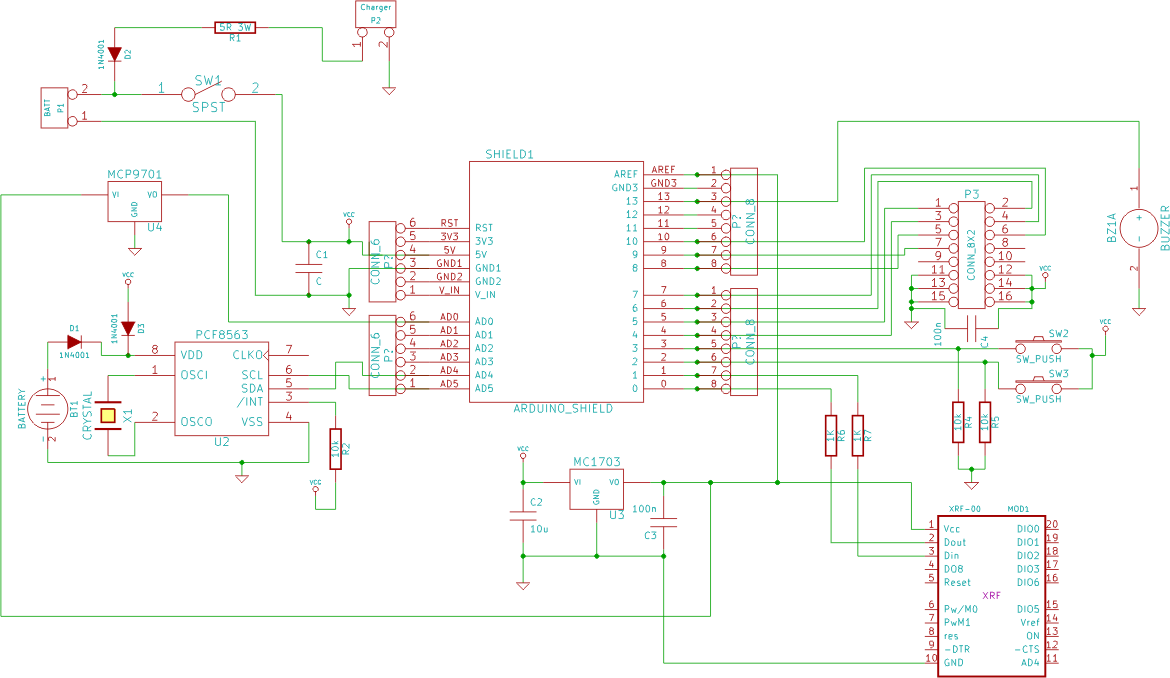
A comprehensive electronic schematic for this display unit can be derived from the components and functionalities described. The LED dot matrix serves as the primary visual output, capable of rendering various graphical and textual information. The interfacing between the Arduino-compatible board and the LED matrix can be achieved using a simple multiplexing technique, enabling efficient control of the individual LEDs while minimizing pin usage on the microcontroller.
The interface PCB should include necessary connections for the LED matrix, ensuring proper alignment and power distribution. Additionally, the inclusion of switch inputs allows for user interaction, which can be wired to digital input pins on the Arduino board. This facilitates functionality such as changing displayed information or adjusting settings.
The Xino board, being a compact alternative to standard Arduino boards, is mounted securely on the acrylic base, with appropriate spacing to prevent short circuits. The power supply for the entire unit should be considered, ensuring it meets the voltage and current requirements of both the LED matrix and the microcontroller. A voltage regulator may be necessary if the power source exceeds the recommended input for the components.
The design layout, created in HeeksCNC, should be optimized for both aesthetics and functionality, providing adequate ventilation for the electronic components while ensuring a visually appealing finish. The CNC-cut acrylic pieces not only serve as a structural framework but also enhance the overall appearance of the unit, contributing to its usability in various settings.
In conclusion, this display unit design is highly adaptable, allowing for numerous applications. The combination of a user-friendly interface, open-source software support, and customizable hardware makes it a valuable addition to any project requiring visual display capabilities.For a couple of recent projects we have been asked to provide interesting and informative display units. We decided to build a unit which can be used in a number of different applications. It was designed to look good, be able to show graphics and text, have a couple of switch inputs and be configurable for a variety of uses.
The end result was so useful, we decided to produce this design and a kit of the main parts. We are using a 32 by 8 LED dot matrix supplied by Sure electronics, based in Hong Kong. They also have an eBay shop. The price ranges from $8 to $16, check eBay first. To keep development time to a minimum, an arduino is used as the `brains` of the unit. This is a development board based upon the ATMEL 328 microprocessor chip. Our units use the less-expensive Xino, an arduino clone from Ciseco. Any Arduino compatible board should fit into this display unit (except the MEGA range). There are numerous open-source examples available for the arduino, hence development time is very short. We have developed a simple clock unit with temperature history display as a sketch to get you going with the use of this display, but the final use is left up to your imagination.
A specially designed interface PCB has been produced for this unit. There was some extra space on the interface board, so we decided to add a number of components which might be useful for your project. These include: The hardware is mainly two pieces of frosted acrylic plastic which are cut out using a CNC machine.
The Xino and LED display bolt onto the plastic and spacers are used to hold the two pieces of plastic together. The design for the plastic was produced using HeeksCNC, the design file is available here. The output g-code is used on our desktop CNC machine run on an Ubuntu machine using EMC2. 🔗 External reference
Related Circuits
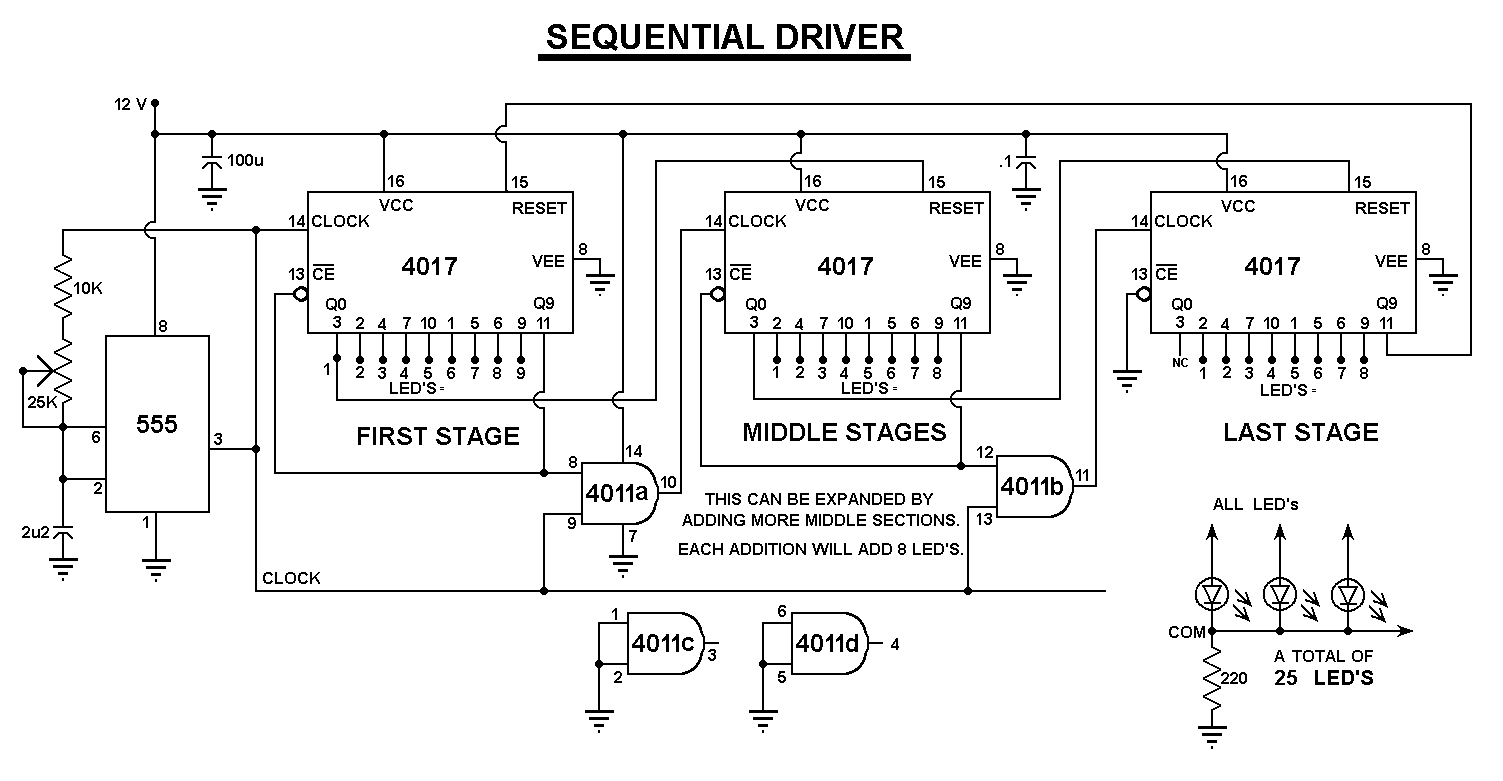
All LED negatives are connected to the "COM" pad, then through a 220 Ohm resistor to ground. There is no need for additional current limiting resistors, even with supply voltages up to 16 volts. The described circuit employs a simple...

A radio-controlled electronic flash is a valuable tool in any photographer's kit, frequently utilized by professionals. For instance, a wedding photographer may position one behind the bride to illuminate her gown and veil, avoiding visible wires in the shot....
The circuit employs 60 individual LEDs to represent the minutes of a clock and 12 LEDs to indicate the hours. The power supply and time base circuitry are consistent with those described in the previous 28 LED clock circuit....
This emergency LED light is simple, inexpensive, and easy to build. The circuit connects to the battery, activating when the main power source is unavailable, such as during brownouts. White LEDs turn on automatically. Initially, the output voltage from...
If we have a lot of parallel telephones on a telephone line, we needed a unit that will have the possibility of showing if somebody of the telephone has raised the earphone. Our this possibility give the circuit. The...
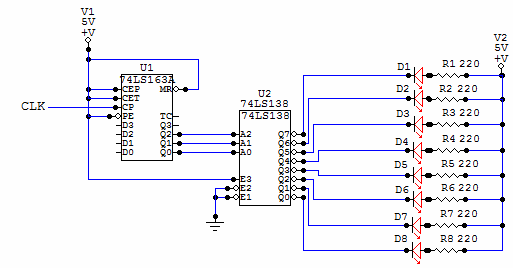
This is a very simple circuit to build, just take note of the control pins on each IC, since both have enable inputs for counting or output, but once set you don't need to worry about them. From left...