
Microchip PIC Serial Port Programmer
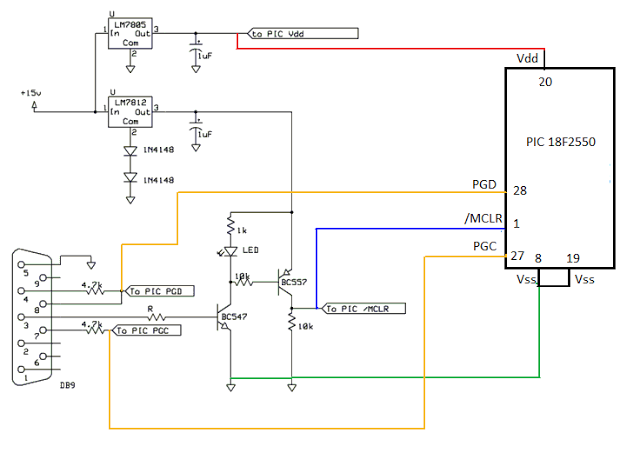
The described circuit functions as a programmer for Microchip PIC microcontrollers using a serial COM port interface, leveraging the JDM programming method. The schematic typically includes a microcontroller interface that connects to the target MCU's programming pins: PGC for clock signals and PGD for data transfer. The Vpp pin serves as the programming voltage or reset line (/MCLR), while Vss and Vdd provide the necessary ground and power supply connections, respectively.
The programmer circuit is designed with standard components such as resistors, capacitors, and diodes to ensure compatibility and reliability. A typical configuration will include a voltage regulator to maintain stable voltage levels for the MCU during programming. Additionally, a series of LEDs may be incorporated to provide visual feedback on the status of the programming operation, ensuring that the user can monitor the process effectively.
The Windpic 800 software serves as the interface between the PC and the programmer, facilitating the transfer of hex files to the target microcontroller. The setup process within Windpic involves selecting the appropriate hardware settings that correspond to the specific programmer configuration, ensuring that communication between the PC and the programmer occurs without issues.
Once the hardware is connected and configured, the programmer can detect the connected MCU, allowing the user to load the desired firmware. The programming process is initiated through the software interface, and the LED indicators provide real-time feedback, confirming the successful transfer of data to the microcontroller. This setup is particularly advantageous for hobbyists and professionals working with Microchip PIC microcontrollers, as it provides a cost-effective and efficient means of programming various devices using widely available components and software tools.This is a Simple com port based Microchip PIC microcontroller Programmer, This Programmer is based on JDM programmer. The entire programmer is built around commonly available components you can programe may microcontroller by using this schematic, all you need to do is that find out the data sheet of that mcu you want to program and check the pin
configration. and the lookfor PIN PGC(clock) PGD(data) Vpp(/MCLR) and the power Vss And Vdd like shown in the image blow. To be able to send hex file from your computer to PIC microcontroller you will need to download and install Windpic 800.
After the installation, the first thing you will need to do is configureWinpic to work with ourPIC Programmer. To do this go to "Setting" menu and select "Harware setting". The following window will be shown and highlighted areas show you exactly which options should be selected.
Now Just connect you programmer circuit to the com port Click on hardware test button in the tool bar, if hardware test is okey then clickon just right side button`detect device` as soon as your devide is detected. now you are all set to open youhex file and load in to the mcu. to start programmingpress the Programall Buttonin the tool bar. wait for a while to finish the programming. when the programming is going on the ledmust beglowing. 🔗 External reference
Related Circuits
The result displayed on the LCD is incorrect; the thermometer shows a reading of 414 degrees instead of the actual room temperature. Assistance is needed to determine whether the issue lies within the hex file or the sensor itself....
Use microcontrollers to establish serial communication between the AVR-006 kit and a computer. This project utilizes the AVR-006 microcontroller from Circuits-Home. Before developing the program, it is essential to understand the hardware specifications. An example program (in C) for...
The circuit drives the LCD pins with 50% square waves. Each segment on this LCD is connected to the COM backplane and a separate pin. When a pin is driven in phase with the COM pin, the corresponding LCD...

Magic Sinewave Analysis using SPICE and a Simple Inverter Circuit. This document discusses the analysis of a sinewave signal generated by a simple inverter circuit using SPICE simulation software. The inverter circuit is designed to convert a DC input voltage...
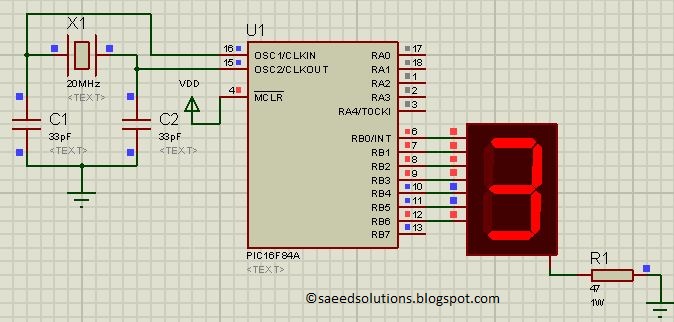
This post presents the implementation of a free-running counter using the C programming language for the PIC16F84A microcontroller. The code is structured to... The PIC16F84A microcontroller is a widely used device in various embedded applications, characterized by its 8-bit architecture...
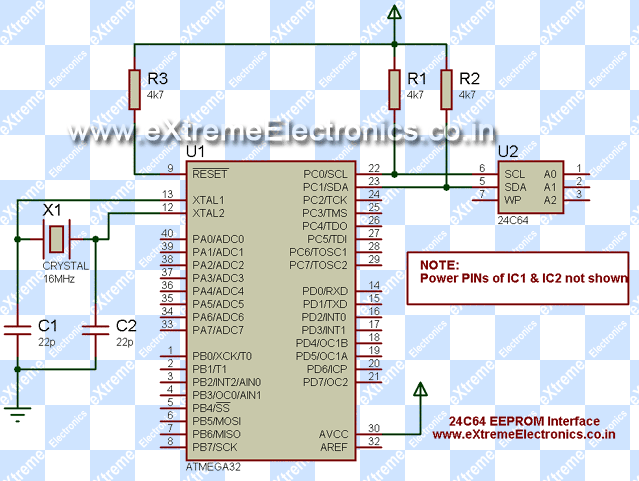
An EEPROM is a type of non-volatile memory, which means it is used for permanently storing digital data without any power supply. EEPROM stands for Electrically Erasable Programmable Read-Only Memory. The advantage of this type of ROM is that...