
programming avr using usb asp
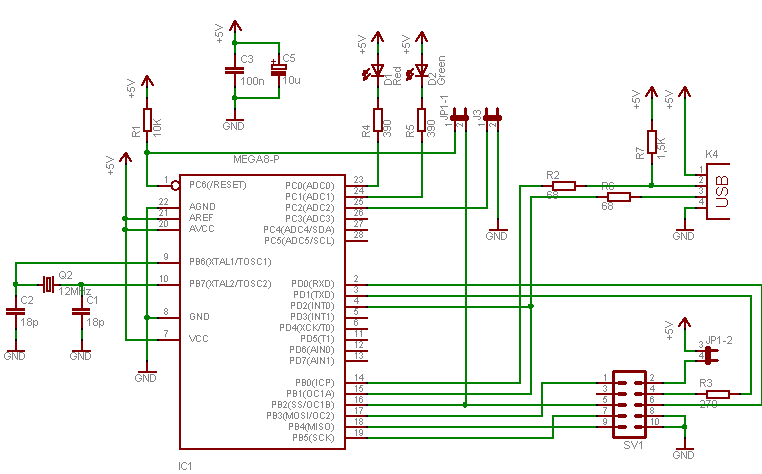
USBasp is a USB in-circuit programmer for Atmel AVR microcontrollers. It is a cost-effective solution for programming microcontrollers directly via a USB interface, eliminating the need for traditional parallel or serial ports. The USBasp programmer connects to the target microcontroller through a set of pins that correspond to the ICSP (In-Circuit Serial Programming) interface.
To set up the USBasp programmer, the following components are typically required:
1. **USBasp Programmer**: This device contains the necessary circuitry to interface with the USB port of a computer and the microcontroller. It includes an ATmega8 microcontroller that handles the USB communication and programming tasks.
2. **Target AVR Microcontroller**: The microcontroller to be programmed, which must support ICSP. Common examples include the ATmega series.
3. **Connecting Wires**: These are used to connect the USBasp programmer to the target microcontroller. The connections typically include MISO, MOSI, SCK, RESET, VCC, and GND.
4. **Software**: The avrdude software is essential for sending the hex file to the microcontroller. WinAVR is a package that includes avrdude along with other tools for AVR development.
The programming procedure generally involves the following steps:
1. **Install avrdude**: Download and install the WinAVR package, which includes avrdude. This software will facilitate communication between the host computer and the USBasp programmer.
2. **Install USBasp Driver**: Depending on the operating system, a driver may be required for the USBasp to be recognized by the computer. Download and install the appropriate driver.
3. **Connect USBasp to Microcontroller**: Using the connecting wires, attach the USBasp to the target microcontroller according to the pin configuration specified in the USBasp documentation.
4. **Prepare the Hex File**: Ensure that the hex file to be burned is ready and accessible on the computer.
5. **Execute the Programming Command**: Open a command line interface and use avrdude commands to specify the programmer type (USBasp), the target microcontroller, and the path to the hex file. The command typically looks like this:
```
avrdude -p m8 -c usbasp -U flash:w:yourfile.hex:i
```
Replace `m8` with the appropriate part number of the target microcontroller and `yourfile.hex` with the name of the hex file.
6. **Monitor the Programming Process**: Watch for messages in the command line interface that indicate the success or failure of the programming operation.
This setup allows for efficient programming of AVR microcontrollers, making USBasp a favored choice among developers and hobbyists alike.For burning a program in a AVR uc using usb port instead of parallel or serial then USBasp is the best option. For circuit diagram of USBasp click here. following are the procedure for burning the hex file Install the avrdude (winavr) ,it can be downloaded from click here Download USBasp driver ,you can download..
🔗 External reference
Related Circuits
The joystick button inputs can be used as general purpose button or switch inputs, and can also be driven by logic level signals or by open collector or open drain logic outputs. If used with a signal direct from...
This project measures the clock pulses supplied to the Timer input of the AVR microcontroller. The Bascom code counts the clock pulses over a duration of 1 second and displays the result. The circuit for this project primarily consists of...
This is a water sensor alarm circuit designed to warn users about water levels. It activates an audible alarm when the sensor comes into contact with water, such as during rainfall. The water sensor alarm circuit functions primarily as a...

This project focuses on the development of a low-cost cosmic ray detector utilizing common fluorescent tubes. It is based on an experiment conducted in 2000 by Dr. Schmeling at CERN, which demonstrated a straightforward method for detecting and visualizing...
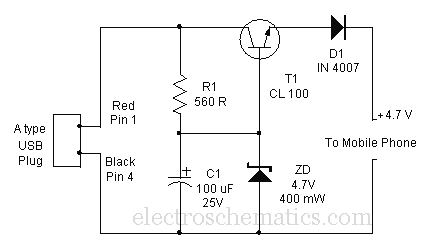
A mobile phone can be charged using the USB outlet of a PC. This simple USB cellphone charger circuit provides a regulated output of 4.7 volts for charging the mobile phone. The USB outlet typically supplies 5 volts DC...
If the robot is positioned on the black line, it will continue moving forward. However, if it veers off the line and enters a white area, it will assess whether to correct its path to the left or right,...