
Sega Saturn controller to USB adapter
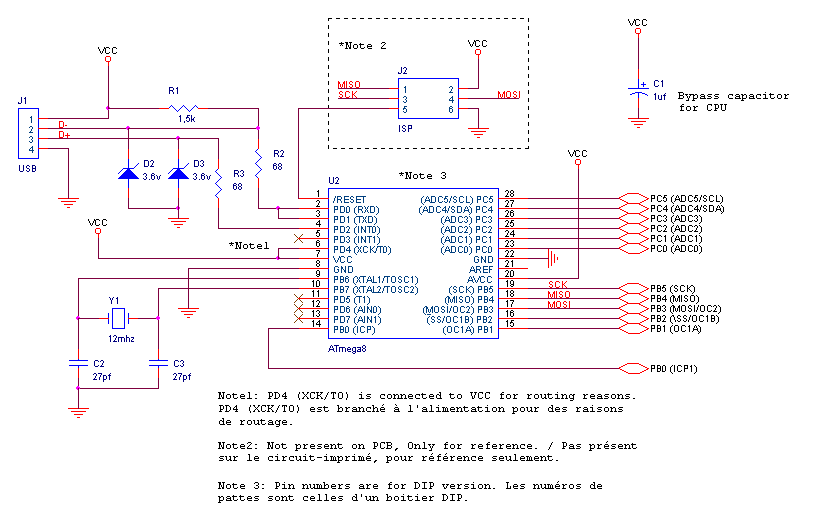
For the USB connection, the USB cable should be stripped, and the wires soldered directly to the board. USB employs standard wire colors, but caution is advised with inexpensive cables that may use non-standard color codes. A microcontroller is required, which must be programmed to function effectively. The hex file necessary for programming the microcontroller is provided. Many microcontrollers feature what are known as "Fuse bytes." In the case of the ATmega8, there are two bytes: the high byte and the low byte, which configure various aspects of the microcontroller, such as clock type (Crystal Resonator or Internal RC clock) and programming via ISP. It is crucial to set the fuses to the correct values, as incorrect settings can render the microcontroller unusable. The source code is released under the GPL license and compiles with avr-gcc. To avoid conflicts, it is advised not to distribute modified versions where the USB report descriptor has been altered without changing the USB Vendor ID and Product ID to unique values. It is recommended to obtain personal identifiers (or create new ones, despite potential risks) rather than reusing existing VID/PID numbers. The IDs were purchased from Mecanique, which previously offered small portions of the PID space at a lower cost than acquiring a vendor ID from usb.org, which is priced at $2000 USD.
The project involves careful attention to detail in both hardware and software aspects to ensure compatibility and functionality across various platforms and devices. Proper soldering techniques and adherence to USB standards are necessary to achieve reliable performance. The firmware must be appropriately flashed into the microcontroller, and the correct configuration of fuse bytes is essential for the intended operation of the adapter. This project not only serves as a practical solution for retro gaming enthusiasts but also demonstrates the versatility of USB technology in interfacing with legacy gaming peripherals.This projects makes it possible to use Sega Saturn peripherals (controllers, mouse) on a PC through an USB port. Using the schematic and firmware available on this page, one can make an adapter (Using the connector from a Saturn extension) or convert a controller (if it has enough internal free space).
Thanks to USB HID compliance, the adapter wor ks immediately on most modern systems without installing special drivers. Tested under Linux, Windows 7 64-bit, MacOS X and Sony Playstation 3. William Schneider sent me the following picture of this project assembled in a breadboard. He also confirmed that everything works fine with the Sega HSS-0101 controller, and that firmware version 1. 1 works very well with the PS3: The following mappings are available. To enable specific mapping, press and hold the corresponding button, connect the adapter (or power-up the console/computer), and release the button.
On the PS3, the SLS (default) and SLS Alt mappings are usually the most suitable. They have been reported to work well for Super Street Fighter IV, Tekken 6, BlazBlue: Continuum Shift, Virtua Fighter 5, Arcana Heart 3, Hard Corps: Uprising, Soul Calibur, Disgaea 3 and Mortal Kombat 9. The signal labelled as "+5v (Inp)" in the above mentionned webpage is in fact a logic output used by the Analogic controller and mouse.
This signal is part of an handshake mechanism used to transfer a sequence of values. In fact, these peripheral communicate exactly like the Genesis multitap do. For details: For the USB connection, just strip the USB cable and solder the wires directly to the board. USB uses standard wire colors, but beware of cheap cables built with non-standard color codes. A microcontroller is a component which must be programmed in order to do something useful. So here is the hexfile which must be flashed into the microcontroller: Many microcontrollers have what is called `Fuse bytes`.
In the case of the ATmega8, there are two bytes: The high byte, and the low byte. Those bytes are used to configure some aspects of the microcontroller. What type of clock to use Crystal Resonator Internal RC clock Allow programming via ISP It`s very important to set the fuses to the right values. Using the wrong values can render your MCU unusable. The source code is released under the GPL license and compiles with avr-gcc. To prevent conflicts, please do not distribute modified version where the USB report descriptor has been modified without replacing the USB Vendor ID and Product ID by yours.
Please do not re-use my VID/PID for derived projects. Please obtain your own numbers (or invent one despite the risks). I bought my IDs from mecanique. They used to sell small chunks of the PID space which was much cheaper than buying a vendor ID from usb. org (2000$ USD). 🔗 External reference
Related Circuits
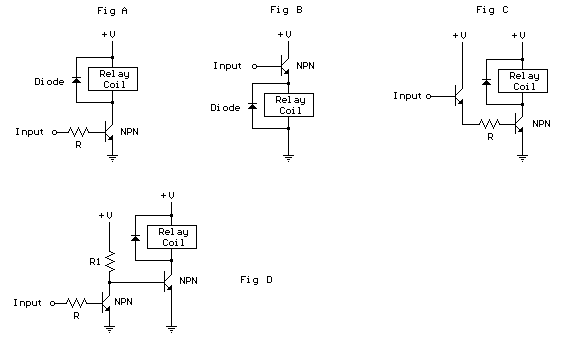
The schematic below illustrates 4 methods of controlling a relay with a digital logic signal. Figure (A) can probably be used in most cases where the relay coil requires 100 mA or less and the input current is 2...
It connects to the USB port and is ideal for checking motherboard switch and jumper settings. Many users may recall a commercial product of a similar nature. This device serves as a USB-based diagnostic tool designed to facilitate the verification...
This simple AVR programmer is capable of transferring hex programs to most ATMEL AVR microcontrollers. It is more reliable than many other simple AVR programmers available and can be constructed in a very short amount of time. This programmer...
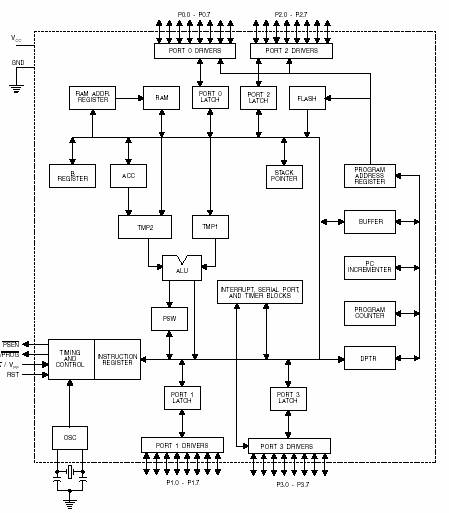
A microcontroller (MCU) is a compact computer integrated into a single circuit, comprising a relatively simple CPU along with supporting functions such as crystal oscillators, timers, sensors, and serial and analog input/output (I/O). Microcontrollers are designed for small-scale applications,...
The primary objective is to present the circuit diagram and describe the software utilized. A UDP application is employed to transmit commands to the microcontroller, which subsequently activates or deactivates the relay. It is anticipated that TCP implementation could...
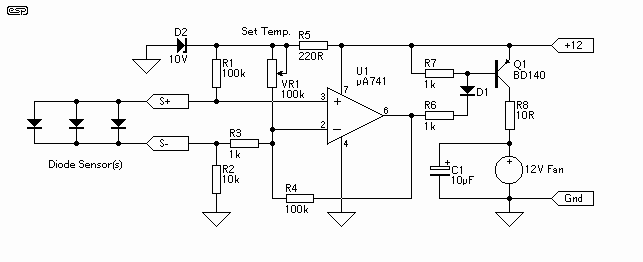
The controller uses one or more ordinary silicon diodes as a sensor, and uses a cheap opamp as the amplifier. I designed this circuit to use 12V computer fans, as these are now very easy to get cheaply. These...