
Brushless DC (BLDC) motor with Arduino
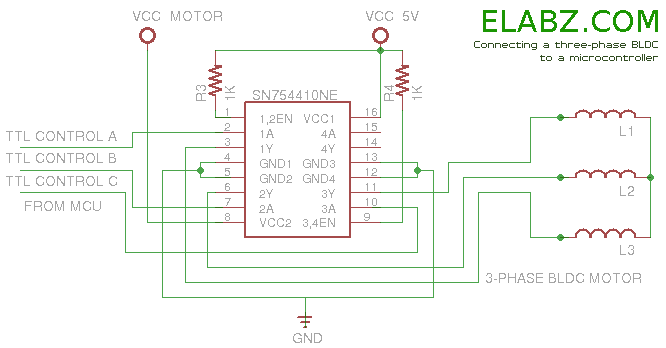
The task of driving a brushless DC motor, particularly one sourced from a DVD drive spindle, can be effectively accomplished using an Arduino or similar microcontroller unit (MCU). Brushless DC motors, known for their efficiency and reliability, require specific control strategies to manage their operation. The following outlines the essential components and considerations for designing a circuit to control such a motor.
The primary component of the system is the brushless DC motor itself, which typically consists of a rotor with permanent magnets and a stator with windings. Control of the motor can be achieved using an electronic speed controller (ESC) or through direct PWM (Pulse Width Modulation) control by the Arduino. When using an ESC, the motor can be controlled by sending PWM signals that dictate the speed and direction of rotation.
The Arduino board serves as the central processing unit, where the sketch (program) is written to determine the motor's behavior. The sketch should include the necessary libraries for PWM generation and potentially for interfacing with the ESC. The output pins of the Arduino are connected to the signal input of the ESC, while the ESC is connected to the motor and a suitable power supply.
Additional components may include capacitors to smooth voltage fluctuations, diodes for back EMF protection, and resistors for current limiting, depending on the design specifics. It is crucial to ensure that the power supply matches the voltage and current specifications of both the motor and the ESC to prevent damage.
Safety precautions should be considered, as brushless motors can generate significant torque and may pose risks during operation. Proper mounting and housing of the motor, along with emergency stop mechanisms, are recommended.
In summary, driving a brushless DC motor with an Arduino involves careful selection of components, programming the microcontroller for appropriate control, and ensuring safety measures are in place for effective and reliable operation.Arduino sketch and other useful information about driving a brushless DC motor, such as DVD drive spindle motor, using Arduino or another MCU 🔗 External reference
Related Circuits
A programmable 8 step tone sequencer using an Arduino microcontroller. Features a 2 line x 16 character backlit LCD display The circuit design for the programmable 8 step tone sequencer based on an Arduino microcontroller incorporates several key components that...

DC motor control circuit using NE555. The 555 timer circuit has numerous applications. For those unfamiliar with its functionalities, an authoritative book can provide valuable insights. CircuitsToday offers an online store featuring reviews of three highly recommended books that...
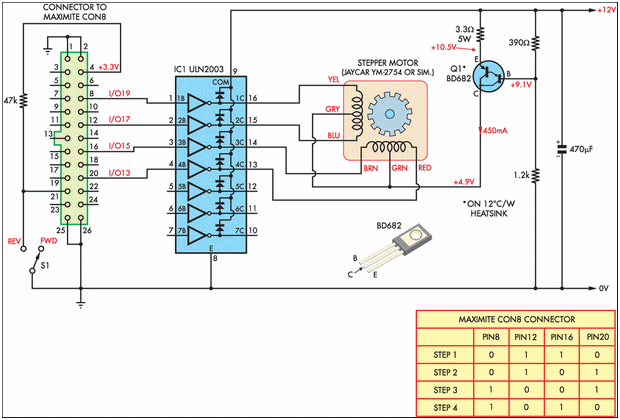
Designing and implementing this circuit was an exciting endeavor. The design of the interface involved learning how to control a device from a computer. A parallel port cable was utilized for this purpose, enabling instant control of the stepper...
A programming jig has been constructed to eliminate the need for maintaining the circuit on a breadboard. Additional details and photographs are available on the Learning About the AVR Parallel Programmer page. The programming jig serves as a dedicated platform...

This circuit can control a small DC motor, like the one in a tape recorder. When both the points A and B are "HIGH," Q1 and Q2 are in saturation. Hence, the bases of Q3 to Q6 are grounded....
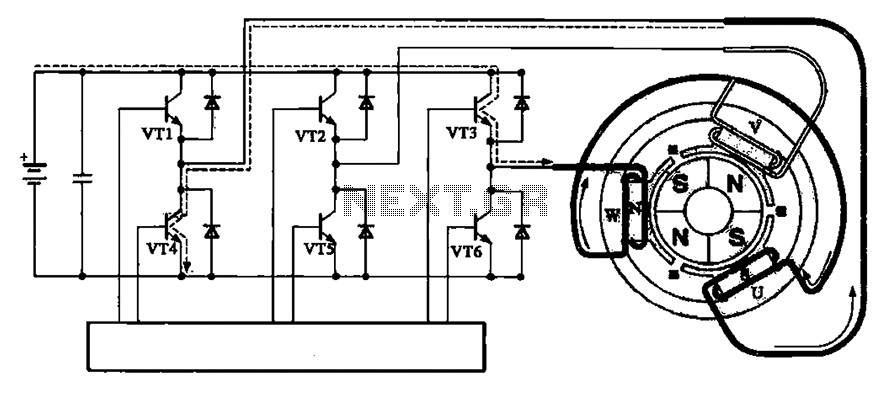
The brushless motor consists of a rotor, a stator, and a drive circuit. The relationship between the brushless motor rotor, stator, and drive circuit is illustrated in the accompanying figure. In the initial state, VT3 and VT4 are conducting,...
Warning: include(partials/cookie-banner.php): Failed to open stream: Permission denied in /var/www/html/nextgr/view-circuit.php on line 713
Warning: include(): Failed opening 'partials/cookie-banner.php' for inclusion (include_path='.:/usr/share/php') in /var/www/html/nextgr/view-circuit.php on line 713